Table of Contents
Introduction
Imagine stepping out into your backyard on a warm summer day, the sun warming your face, and there it is—your own custom pool, glistening like an oasis of fun and relaxation. Sounds dreamy, right? Well, if you live in Pennsylvania, building that dream pool is more than possible—it’s an adventure. But what exactly does the journey from a patch of grass to a sparkling pool look like? Buckle up, because we’re going to take a deep dive into what it takes to build a custom pool here in Pennsylvania, one step at a time.

Step 1: The Dreaming and Designing Stage
Building a pool isn’t just about digging a hole and filling it with water—it starts with a dream, and then a design that fits your specific desires and your backyard. Do you picture a freeform lagoon, or are you more of a clean-lined, modern pool person? The first step is to meet with your chosen pool builder in Pennsylvania to talk through your vision.
Tip: Bring along a Pinterest board or even a napkin sketch to these early meetings—it helps the designers understand what you’re looking for.
This stage involves a lot of questions: How big should the pool be? What’s your budget? Do you want a saltwater system or traditional chlorine? It might sound overwhelming. However, a skilled pool builder will help narrow down your options. They will create a blueprint that brings your pool dreams to life while keeping practicalities (like Pennsylvania’s sometimes fickle weather) in mind.
Step 2: Permits and Paperwork
Spoiler alert: Pennsylvania doesn’t let you just start digging without proper authorization. Before breaking ground, you’ll need permits from your local authorities. Depending on your township, you might need zoning approval or HOA consent, and there are usually codes regarding fencing and safety.
This is where having an experienced contractor is crucial—they know how to navigate the red tape. It might take a few weeks to get everything approved, but trust me, it’s worth the wait to avoid any future headaches with inspectors (or the nosy neighbor who’s suddenly an expert in zoning laws).
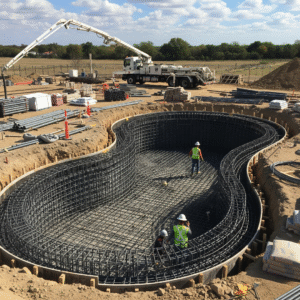
Step 3: Excavation and Groundwork
Now comes the part where your backyard starts to transform—excavation. Picture this: heavy machinery rolls in, and before you know it, there’s a massive hole right where your old lawn used to be. Don’t worry, it looks chaotic, but it’s all part of the process.
The excavation can be one of the trickiest parts because Pennsylvania’s diverse terrain can throw a few surprises your way—rocky soil, roots, even old underground structures. But a skilled contractor knows how to handle these little hiccups, and soon enough, they’ll prep the foundation for your custom pool.
Pro Tip: Take pictures of this phase—it’s a great conversation starter, plus it’s amazing to see how far your backyard has come once the project is complete. Consider taking before-and-after shots or capturing key construction phases to truly appreciate the transformation.
Step 4: Installation of Plumbing and Rebar
Before anything else happens, plumbing lines are installed for the water circulation system. This ensures proper filtration and heating if you opt for those luxuries (and believe me, in chilly Pennsylvania springs, you want that heater!).
After plumbing, the pool’s steel skeleton—or rebar—is assembled. This web of steel provides the structure and strength for your pool. Think of it as your pool’s bones, giving it shape before anything else fills in the frame.
Step 5: Shotcrete or Gunite Application
Next, it’s time to create the shell. This is done with either shotcrete or gunite, which are types of concrete sprayed over the rebar frame. Shotcrete is applied using a wet mix, while gunite is a dry mix that is mixed with water at the nozzle, giving more flexibility in application. Talk to your builder to determine which is better for your specific needs. Once this step is complete, the pool really starts to take shape. The workers will sculpt the contours to match the design—whether it’s curves, sharp angles, or a mix of both.
Note: Gunite is a popular choice in Pennsylvania because it’s super durable and handles those freeze-thaw cycles pretty well. If you’re not sure which material to choose, talk to your pool builder about the pros and cons for your particular setup.
Step 6: Tile and Coping
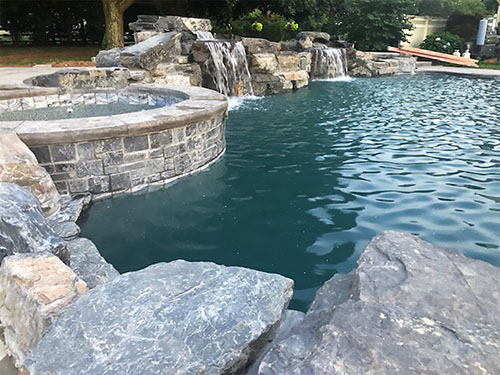
Here’s where your pool starts to look beautiful. Tiles are added along the waterline, and coping is installed along the edges of the pool. Pennsylvania pools often use natural stone coping, which blends beautifully with the landscape, giving a classic and timeless look that works well with the region’s scenery. The choice of tile can make a big difference in your pool’s final appearance, so take your time with it.
Step 7: Electrical and Decking
Now it’s time to wire up your pool. This includes the lights, which can be used to set an incredible nighttime mood, and any other electrical needs—like the heater or a waterfall feature. Once this is sorted, the crew will move on to building the deck around the pool.
You’ve got options here—from traditional concrete to pavers to wood. Each material brings a different vibe. For Pennsylvania, a lot of homeowners choose stamped concrete for its durability and its ability to mimic more expensive materials like slate or brick.
Step 8: Plaster and Filling
The final major step is applying the plaster. This is the layer that seals your pool and gives it that shiny, inviting appearance. There are a few types of plaster, including colored options to give your pool a unique hue—anything from classic white to a rich blue.
Once the plaster is set, it’s time to fill your pool. This is the moment you’ve been waiting for! And it takes a while—expect it to take at least a day or two for the pool to fill completely.
Step 9: Balancing the Chemicals and Finishing Touches
You’re almost ready to dive in, but before that, the water needs to be properly balanced—meaning adjusting the pH, chlorine levels, etc. It’s a bit of a science, and your pool builder will help you get it just right. Once the chemistry is good to go, you can start thinking about finishing touches—landscaping around the pool, setting up lounge chairs, maybe even adding a fire pit for those chilly Pennsylvania nights.
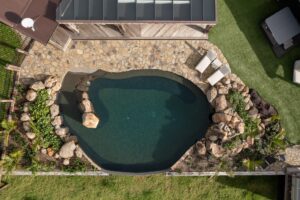
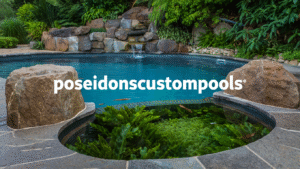
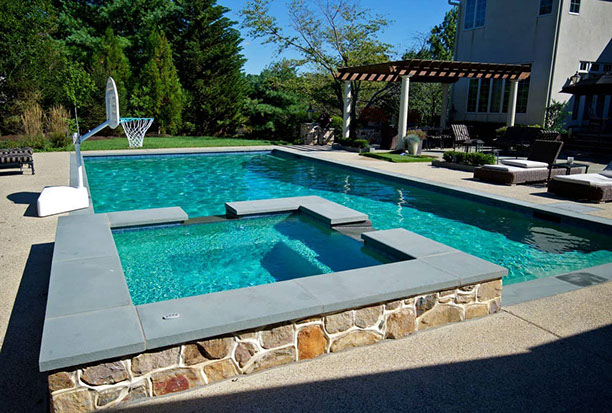
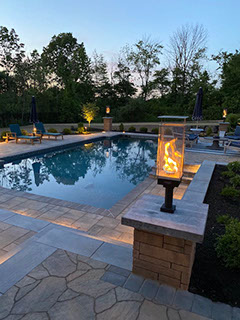
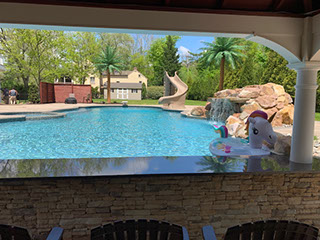
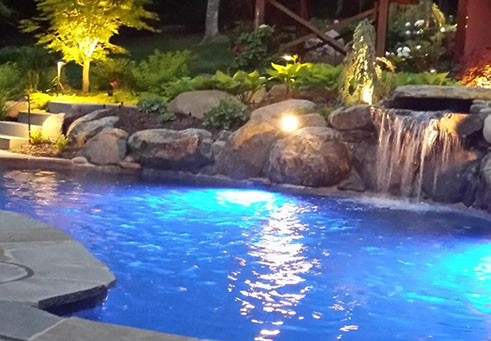
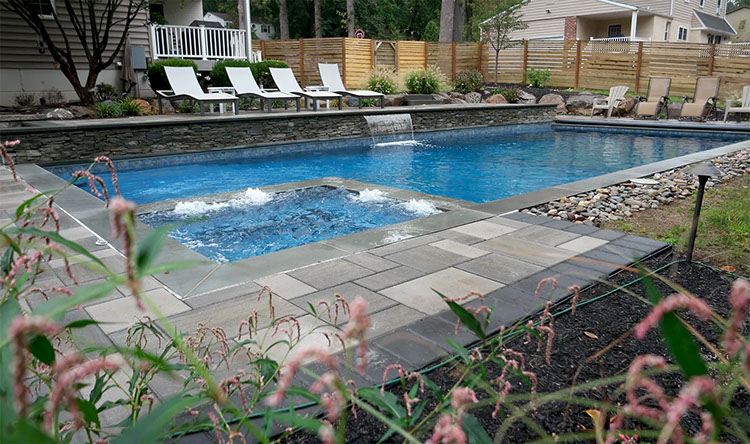
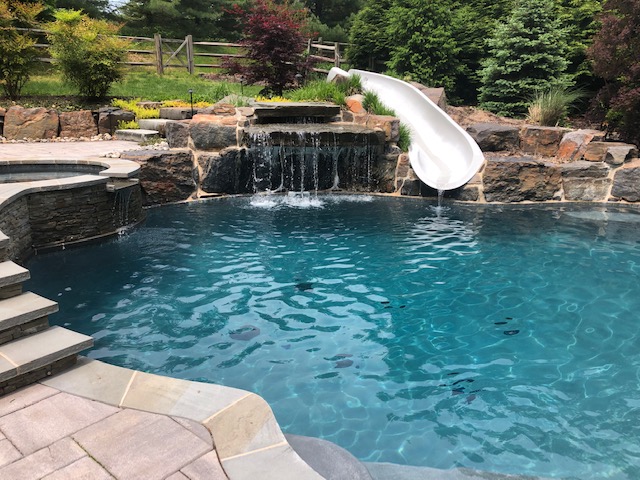
Our Portfolio Of Best Custom Pools: Click on the Image to Full view:
Frequently Asked Questions
1. How Long Does It Take to Build a Custom Pool in Pennsylvania?
Typically, the entire process from design to taking your first swim takes about 8-12 weeks, depending on weather conditions and permit approvals.
2. What Type of Pool is Best for Pennsylvania’s Climate?
Gunite pools are generally a great option because they handle the freeze-thaw cycles well, but fiberglass can also be a quick, cost-effective choice.
3. Do I Need a Pool Heater?
Considering the unpredictable Pennsylvania climate, a pool heater is almost always recommended. It extends your swimming season significantly.
4. How Much Does a Custom Pool Cost in Pennsylvania?
The cost can range from $50,000 to $100,000+, depending on size, materials, and features like waterfalls, lighting, and automation.
Conclusion
Building a custom pool in Pennsylvania is more than a backyard upgrade—it’s an adventure and an investment in your home and lifestyle. It not only enhances family enjoyment but also significantly increases property value, making it a worthwhile long-term investment. From dreaming up the design to diving in on that first summer day, the process is filled with excitement and anticipation. If you’ve ever thought about transforming your backyard, now’s the perfect time to make it happen.
Ready to turn your pool dreams into reality? Connect with trusted pool builders in Pennsylvania today to get started on the journey to your own oasis. And hey, when that first cannonball happens, be sure to invite me—I love a good splash!


7 Responses